Are you ready to transform your skin in just one week?
A few days ago I wrote about glowing up and doing it through all aspects of your life, not just with makeup and new hair.
However, other women wanted to know how to do a little glow up challenge to improve their skin!
Welcome to the 7-day glowing skin challenge, a step-by-step journey to radiance.
Glowing skin has always been a goal that we all would love. It’s a reflection of good health and increases your self esteem.
Who doesn’t love radiant skin?
It doesn’t mean you need to spend much money or feel you will need to obsess over what you lather on. I want to show you that a few tips and good habits can give you clear, glowing skin!
As I mentioned in my other post, I’m not a professional, but I have skin, and I used to have dull skin. With a few extra tips (I mentioned some in this post, but I have more to share), you will be able to have a radiant glow and feel like an elegant woman by next week.
This post is here to inspire you, not to be taken as medical advice!
I won’t lie; I even saw differences in my skin after a single night! Let’s get started!
Introduction
Glowing skin is something every woman dreams of.
It exudes youthfulness, vitality, and elegance.
With the 7 days glowing skin challenge, my goal is simple: to guide you through a regimen that will nurture your skin inside and out.
The daily tasks are designed to be easy to follow, even for those new to a skincare routine. Each day focuses on a crucial skincare aspect, ensuring you cover all bases for a luminous look.
Day 1: Cleanse and Exfoliate
A clean canvas is the foundation of healthy skin. Day one is about effectively purifying your skin to remove impurities and promote cell turnover. Besides my diet, this had the most significant impact on my healthier skin.
Step 1: Choose the Right Cleanser
Select a gentle cleanser suited for your skin type – oily, dry, combination, or sensitive. Avoid harsh, stripping formulas, and look for ingredients like salicylic acid for oily skin or hyaluronic acid for dry skin.
I believe in the double cleansing method.
First, I use argan oil and then a bar of soap. It’s not specialized for the face, but I have seen only improvements by using it.
You can choose whatever cleanser that you like. If you’re unsure of what to use, this is when experimenting will do you good. Always try a gentle face wash first, especially if you have skin concerns or sensitive skin.
If you are seeing any skin issues, try another soap.
Step 2: Cleansing Technique
Apply a small amount of cleanser to damp skin, gently massaging in circular motions for 60 seconds. Focus on areas with more oil or makeup, such as the T-zone. Rinse thoroughly with lukewarm water to avoid drying out your skin.
When I use the oil, I lightly massage it in circles and then wipe it off with a clean cloth. I repeat the process.
After the oil is wiped off, I wash it with soap. The first time I apply the soap I don’t use any extra water on my face but let the soap get sudsy. After rinsing it off, I do it again, and this time, I use water. When I use less water, the soap is more concentrated.
Is this improper cleansing?
Perhaps, but with all the professionals touting the right and wrong ways, most overlapping, I decided to find what works best for me.
Step 3: Exfoliate Mindfully
Once or twice a week, use a facial scrub or a chemical exfoliant to slough off dead skin cells. Again, be mindful of how your skin reacts – if you have sensitivity, opt for a gentle exfoliant or consult a dermatologist.
I know there are a couple of different exfoliates. There are the physical and chemical ones. I prefer the physical one as of now. It scares me less.
A face cloth will help remove the dead skin cells without skin damage. Just be sure to do it lightly. Doing this also helps with blood circulation.
A weekly exfoliation is all you need, depending on your skin’s texture. Others with more natural oils and duller skin may prefer to do it more often.
I’ve seen significant changes when I exfoliate regularly to see my face have that nourishing glow!
Like the cleansing, this is personalized, and you should experiment. Taking it as right from me or anyone without trying it on yourself first may cause more damage or won’t get the results that you want.
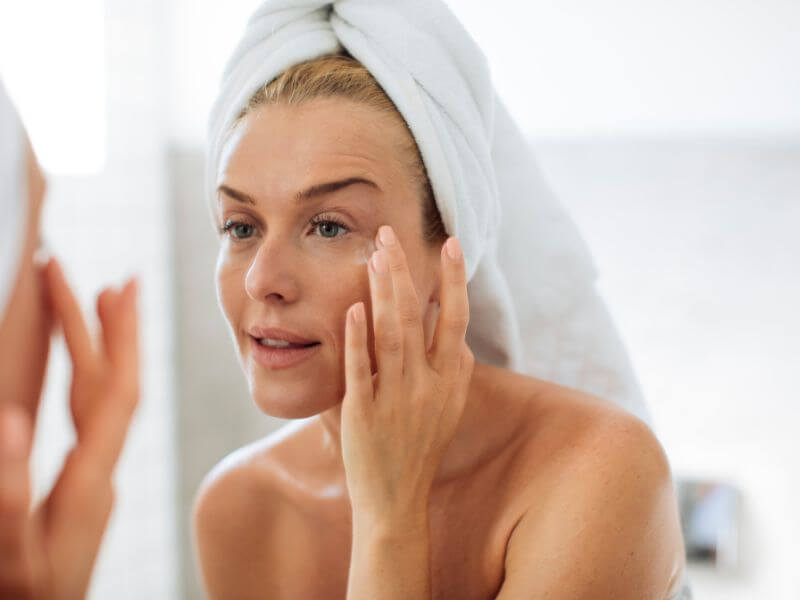
Day 2: Hydrate and Moisturize
For a glowing complexion, hydration is key. Day two will emphasize keeping your skin adequately moisturized throughout the day.
After the first day of focusing on how to clean and what works best for you comes the most important part!
There is a lie that skin ages faster when it is dry, and although it might appear that way, it isn’t necessarily true. When you have dehydrated skin, it looks wrinklier or duller. Having your skin moisturized will ensure a skin glow that you’ll adore! A secret that all elegant women know!
Let’s go to day two.
Step 1: Hydrating Toner
After cleansing, apply a hydrating toner to balance your skin’s pH. Look for toners with ingredients like rose water, aloe vera, or glycerin.
Funny story: you assume that aloe vera is wonderful for your skin. It’s about adding antioxidants and helping your skin health. Well, (and this is why it’s SO important to experiment), I tried aloe vera gel, and my face immediately reacted and was red! It looked like I got burnt. Not all skincare products are meant for everyone!
Luckily, it went down after an hour or so, but I was so scared it wouldn’t go away, and of course, I had somewhere important to be later that morning!
My toner is made of essential oils and witch hazel. It keeps my skin moisturised and my skin healthy. I have been using it now for months and have seen a difference. I know it does help because when I am too lazy or don’t make more, and I skip it, the moisturizer goes on differently.
I spray it on and wipe it off. Do that twice. Then, I spray again and leave it on before adding my moisturizing oil.
Step 2: Layering Your Moisturizers
Use a light, water-based moisturizer for the day. In the evening, incorporate a thicker cream with essential fatty acids, like shea butter or ceramides, to enhance the skin barrier.
I first use a vitamin C oil that includes hyaluronic acid. I’m told it has antioxidant properties from the vitamin C.
After that, I add another oil that boosts collagen production. (Does it really, I guess? I mean, my fine wrinkles seem to fade, and when I don’t use it, they are there all day)
My last moisturizer contains:
A vitamin E oil.
Castor oil.
Essential oils (with citrus fruits because it helps to lighten dark spots).
You can use different oils to give you that radiant complexion, depending on your skin type.
After laying the oils, I’m a little shiny. I let the oils sit on my skin for a few minutes and dab it off gently with a tissue. It prevents clogged pores from ruining pillowcases!
Day 3: Nourish from Within
What you put into your mouth is as important as what you place on your skin. Day three highlights the connection between your diet and your skin’s appearance.
My favorite part of achieving healthy skin is working from the inside out.
Regardless of the products you use, if you’re eating a diet full of processed food and sugar, it won’t help you.
Step 1: Drink Plenty of Water
Start your morning with a tall glass of water. Aim to drink at least eight 8-ounce glasses throughout the day for ultimate hydration.
Drink water throughout the day. The key is to stay hydrated by drinking plenty of pure natural water.
It’s easier for me to drink more water in the summertime, and I see a difference in my skin. It shows in the winter when I don’t want to drink as much. Even if I use a hydrating mask, it can’t work like just simple water.
Step 2: Eat Skin-Friendly Foods
Incorporate a diet rich in fruits and vegetables, particularly those high in antioxidants and vitamins A, C, and E. These include berries, spinach, carrots, and sweet potatoes. Talk about self care in all aspects. By eating a rainbow of food every day, you will glow in just seven days! Your whole body will see a difference, and you’ll need fewer makeup products because your skin will glow!
Step 3: Cut Down on Sugar and Processed Foods
High-glycemic foods and processed sugars can lead to inflammation, which can show on your skin. Opt for whole grains and natural sweeteners for a healthier glow. Many skin concerns come from acne that arises when you eat greasy foods.
I know that if I eat too late and too heavy, I will get acne. It affects so much more than my skin. Getting proper sleep is hard for me, and I get puffy. Not so elegant.
Day 4: Protect from Sun Damage
The sun is the skin’s biggest enemy, but you can keep its damage at bay with the right measures. You might be following me until now, but I never wear sunscreen. I’m not too fond of chemicals on my face, but I respect the sun and understand that if I want glowing skin, I will need to protect it.
I’ve read from other articles that UV rays reduce collagen production, so I understand if you need to wear it, and I won’t say anything! To each their own. And perhaps the sunscreen wearers will have the last laugh!
Wear hats, recede in the shade, or go inside when you know the sun is too intense for your skin type.
The whole point of this skin challenge is to cultivate better habits that will give you that “skin glow” you always wanted.
For this section, I can only say to be more vigilant; shade is your friend!
Day 5: Pamper with Masks and Treatments
Masks and treatments can provide an instant glow. Day five encourages you to take some extra time to pamper your skin.
Step 1: Choose the Right Mask
Opt for a hydrating or brightening mask. Sheet masks are convenient and usually come filled with serums that can deeply hydrate the skin. There are so many face masks now that choosing which is the best for your skin might be a little overwhelming. When you’re first starting, I’d always say a hydrating one.
I use a clay mask when my face collects oil more than usual. This is usually in the summer.
My clay mask is part of my 7 days glowing skin challenge, and I love it!
Step 2: Apply the Mask Correctly
Ensure your skin is clean and dry. Apply the mask, pressing it to your contours to ensure good contact. Relax for the specified time, typically 10-20 minutes.
A little warning.
Don’t wear your mask more than they say. More is not better! My skin tone was not better; if anything, it got more raw.
Always follow the instructions. If you love the results, add it to your glowing skin challenge.
Day 6: Get Your Beauty Sleep
The magic happens overnight. Your body – including your skin – repairs and rejuvenates as you sleep.
Every mother was right! Get your beauty sleep; you will have that glowing skin money can’t buy! Say goodbye to dark circles.
Step 1: Remove Makeup
Always cleanse your face before bedtime to ensure your pores are clean and free of makeup or dirt. All the debris of the day should be washed away before you go to bed. No glowing skin challenge is complete without removing your makeup.
From what I’ve read, wearing your makeup to bed causes your pores to enlarge. I’m still determining if this is true, but why risk it?
Even if there is no enlargement, it also traps dirt in your pores, which is how acne starts. To wake up tomorrow and have a day’s glowing skin, be sure to wash your face!
Step 2: Apply a Night Cream
Night creams tend to be thicker and more emollient than daytime moisturizers. They are designed to provide intense hydration and support your skin’s natural repair process.
If it has a vitamin C included, it will keep your skin supple.
Step 3: Create a Calm Environment
Use a pillowcase made of silk or satin to minimize creasing, and apply a sleep-friendly aromatherapy oil to relax before bed. This indirectly affects your skincare routine because sleep is important for rejuvenation and helps you deal with the day ahead when you have a whole night’s sleep. Don’t underestimate sleep, it needs to be part of your 7 days glowing skin challenge!
Day 7: Maintain Your Glow
As the challenge comes to a close, day seven is about carrying on the practices that have made the most difference in your skin.
Step 1: Continue Good Habits
Reflect on the challenge and note the most effective habits for you. Continue to prioritize those in your daily routine. It will always evolve. Some days will be better than others. Having 7 days glowing skin is possible for the rest of your life. You need to focus on your habits, good or bad!
Step 2: Evaluate Your Products
Assess the products you’ve used during the challenge. Do they suit your skin? Are they delivering the results you desire? Your skin tone will tell you if you need to change your products. The 7 Days Glowing Skin Challenge is just a start; it is essential to keep it going for months and years.
Step 3: Set Long-Term Goals
Set goals that are not unattainable but that you know you can handle. One goal can be to do a facial every week or month. My goals are not to skip a day, to treat my skin like it’s real, and not to be so hard on myself. If I am having some bad skin days, so be it.
But the most important goal is to love my skin, regardless of wrinkles or spots; even if it’s not baby skin soft, it’s my skin and who I am.

Conclusion
The 7 days glowing skin challenge is a great way to kick-start your skincare journey and realize just how much of a difference daily habits can make. Remember, consistency is key. Small, consistent steps can lead to lasting improvements in your skin.